Fresh Apple Cake with Butterscotch Sauce

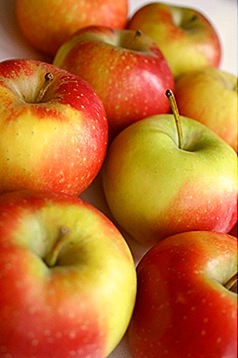
I know it is not officially autumn yet, but school has started, the yummy apples are in the markets, and the cold mornings have already begun.

There are so many apple recipes in my collection, but this particular recipe brings back fond memories of this time of year.  This recipe is my mothers, with slight adjustments.  She made this just after school had started for us one year.  We came home in a snow storm, and this cake was warm out of the oven just waiting for us.  I remember how nice and warm the house smelled of apples and cinnamon, and the feeling of content it brought to me.  I think that particular day, and the memory of that scent is why I love the smell of apples in my house still.

There were not many days like this one — my mother worked and was rarely at home when we got home from school, so the memory of this day always brings a smile to my face.

The recipe calls for raisins, but I dislike them a lot. She didn’t use them either, actually, and used dried apricots.  I’ve tried various dried fruits in this recipe, from dried apples to cranberries, but apricots seem to me to be the best.

Enjoy!

apples

Fresh Apple Cake with Butterscotch Sauce

2 Cups Sugar
1 1/4 cup oil
2 teaspoons vanilla
3 cups sliced apples, peeled and cored
2 eggs
3 cups flour
1 teaspoon baking soda
1 1/2 teaspoon cinnamon
1/4 teaspoon nutmeg
1 cup pecans, chopped
1 cup raisins, optional *see note

Mix together the sugar, egg, oil, vanilla until incorporated, add cinnamon and nutmeg.  Add the flour, and mix thoroughly.  This batter is rather thick.

Pour the batter into a greased and floured cake pan – 9×13.  Bake at 340 for 45-55 minutes.

Allow to cool for about 15 minutes before removing from the cake pan.

Notes:

  • The raisins are optional — I love to substitute the raisins for dried apricots in this recipe.  It just fits together very well.
  • A general rule when baking — don’t use butter to ‘grease’ the baking pan.  If you do, the moisture in the butter does not allow for a good set to the base of the cake.. ie, it never forms a crust.  Use something like Crisco, or some other sort of vegetable shortening.
  • You can use walnuts in this recipe instead of pecans, if you cannot get them.
  • This cake is fantastic with a warm butterscotch sauce — see below.

Butterscotch Sauce

1 cup light brown sugar, firmly packed
2/3 cup light corn syrup
1/4 cup butter
2/3 cup evaporated milk
1/8 teaspoon baking soda
1 teaspoon vanilla

Combine the sugar, syrup and butter and cook, stirring constantly over a medium heat, until the sugar has dissolved and the mixture has come to a full boil.  Stop stirring and boil for exactly 1 minute more.

Remove from the heat, without stirring!!! and let stand for 5 minutes.

In a second bowl, combine the milk, baking soda and vanilla.  Stir into the the slightly cooled sauce.  Serve warm.  Allow to cool before storing in a jar.  To reheat, place the jar in a bowl of hot water until the butterscotch has warmed through.  You can also use a microwave, use a low setting and heat slowly.

Posted in Desserts | Tagged , , , , , , , | 3 Comments

Butterscotch Sauce

Just the way Mom made it…


Butterscotch Sauce

1 cup light brown sugar, firmly packed
2/3 cup light corn syrup
1/4 cup butter
2/3 cup evaporated milk
1/8 teaspoon baking soda
1 teaspoon vanilla

Combine the sugar, syrup and butter and cook, stirring constantly over a medium heat, until the sugar has dissolved and the mixture has come to a full boil.  Stop stirring and boil for exactly 1 minute more.

Remove from the heat, without stirring!!! and let stand for 5 minutes.

In a second bowl, combine the milk, baking soda and vanilla.  Stir into the the slightly cooled sauce.  Serve warm.  Allow to cool before storing in a jar.  To reheat, place the jar in a bowl of hot water until the butterscotch has warmed through.  You can also use a microwave, use a low setting and heat slowly.
Posted in Desserts | Tagged , , , , | Leave a comment

Wordy's Strawberries and Cucumbers

There are combinations of foods that I would never think of going together, and this particular recipe is one of those. I wrote about this on my last blog (before it was accidentally deleted), and want to share it again.

A friend from IRC – Wordsmith – knows of my penchant for trying new and different recipes and one day, about 1 1/2 years ago, I was hungry and not in the mood for anything. He told me to try strawberries and cucumbers. At first, I was like..what the heck kind of combination is that!?! But.. I ended up trying it, and falling in love with the tangy/sweet flavors.

Since then, I’ve found there are a lot of recipes for strawberries and cucumbers out there in the world — from salads and soups, to grilling and stir-frying. Who knew?!

I took the concept of this recipe from Wordsmith, and played around with it. I added the sugar and lemon juice, which seem to balance out the flavors once the vinegar is added. I used warm water to dissolve the sugar, though it isn’t necessary if you are not going to serve this immediately.

Strawberries and Cucumbers

1 pint of strawberries, cored and sliced
1 English cucumber, sliced – peel if it is a bitter peel.
1 tablespoon sugar
2 teaspoons lemon juice
2 tablespoons warm water
2 tablespoons balsamic vinegar

Combine the sugar, lemon juice and vinegar in the warm water. Peel the cucumber if necessary — I usually only do this if the peel is bitter. And even then, I like to leave a little on. I peel the cucumber so it is, in essence, striped. Looks pretty that way, ya know. Pour the sugar/lemon/vinegar juice mixture over the cucumbers and allow to sit for about 15 minutes or so.

Meanwhile, core and slice the strawberries. I like to slice them, you may just want to quarter them. Up to you.

Add the strawberries to the cucumbers and toss to mix. Serve.

Notes:

  • If you are going to serve this later, you don’t need to use the warm water to dissolve the sugar — just mix it with the lemon juice and vinegar, and you are good to go.
  • This salad is so good with left over chicken, or salmon. It’s also great with poached salmon. It’s also great with broiled salmon. Okay…..it’s just really really good with salmon, already ;)
  • I’ve seen some recipes that add mint, use brown sugar, soy sauce, cider vinegar, add spinach..there are endless variations to this recipe.
Tagged , , , , | Leave a comment

Just a little aside ….

I received an email today from a person who has a very popular food blog, and one that I have read for a long while.  I was taken aback at the tone of the email, and the contents. 

Basically, I was told that the last thing the Internet needed was another food blog, that because I am not a chef, or trained, I shouldn’t participate in what was a cooking revolution, and that my recipes were not up to par because they are not written in the classic and traditional way.

Whatever that means.

My idea for this blog is just to write about recipes I know, recipes I make up, and recipes that interest me or others.  I do not purport to be a chef or a classically trained cook of any type, and there is no place on this blog that even hints that I am. 

I just like to write about what interests me – and I’ve always been interested in recipes, and cooking.  I hope the recipes I share here do a bit of educating, make you think about the history of food in the world, as well as in your own life, and that you might try the recipe I’ve posted.

There are hundreds of food blogs on the Internet..and thousands of web sites dedicated to recipes.  This blog isn’t supposed to be anything other than my own take on food.  For those who think “another food blog” isn’t necessary, I say, hey.. don’t read it.  For those who think that a person who isn’t a chef, isn’t a trained cook, and doesn’t write a recipe in the classic and traditional way shouldn’t share recipes.. I say.. well, don’t read my blog.

I write to tell a story – I tell a bit about myself, my history and yes, I do not write a recipe in the “classic and traditional way”.  I write it for me, and for my friends who love my recipes, and my cooking, and for those who stumble upon this blog, looking for something I’ve written about.  Having a recipe written “up to par” just doesn’t make sense to me.  I am not Julia Child.  I am a product of my time, and therefore, my cooking and recipe writing abilities come from the ‘Alton Brown’ and “Cooks Illustrated” attitude — “have fun and play with your food”.

I hope the author of the email continues to read my blog — if nothing more than to see that a recipe can be fun, the story behind it can be fun, and food isn’t meant to be taken so seriously.  And if not.. well, that’s fine too.  The Internet is a big place – I’m sure you can find classically written recipes, by chefs, classically trained to your hearts content. 

I also hope everyone else continues to read this blog –  enjoy it, learn from it, and, on occasion, laugh.  Food and recipes are something to have fun with – and so is this blog – an extension of my cooking and my kitchen behavior.  I like to have fun, be silly and tell it like it is. 

I’m now off to play with my food — There are 2 cans of whipped cream in my kitchen.. and I have a feeling my son might just try and attack me with one of them.  I’ve got to be prepared.. defending myself with a whipped cream can in one hand..and a chocolate cookie in the other… what better way to enjoy the whipped cream bound to be sprayed on me than with a chocolate cookie?!.

LMP

Tagged | 7 Comments

Baked Peaches with Granola

End of summer brings in bushels of peaches. Here is one of my favorite ways to make baked peaches.

Enjoy!

image

Baked Peaches with Granola

4 large ripe peaches
5-6 tablespoons butter
3/4 cup granola
1 teaspoon sugar
2-3 tablespoons water

Wash and cut your peaches in half.  Leave the skin on so the peaches will hold shape while you bake. If you don’t.. they become.. mushy (a very technical term :P).  Put the peaches cut side up on a baking sheet with lipped sides. 

Put 1 tablespoon of butter into each half of the peach.  Bake at 350F for about 25 minutes, or until they are soft and just lightly browned.

In a small pan, melt the last bit of butter over low heat.  Once it’s melted, add sugar and granola, and cook for about 3-4 minutes. 

When the peaches have about 2 minutes left, sprinkle with the granola mixture and let cook for the remaining 2 minutes.  Remove and serve immediately.

Notes:

  • If you use sweetened granola, don’t add the sugar. As a matter of fact, you don’t have to add the sugar at all.
  • Use a granola that has nuts such as almonds or macadamia
  • Use a granola that has a dried fruit — raisins (if that’s your thing), or cranberries, dried cherries, or even dried peaches.  Just dice any fruit well, and add to the butter just before the granola.  You may need to up the butter to 2 tablespoons when you do this.
  • Don’t add the granola to the oven – instead, bake the peaches as above, and once done, remove, cover with a scoop of ice cream, and cover with the granola.  Mmmy goodness.
  • I’ve made this when camping, too — line a Dutch oven with foil, and add the peaches.  In a bowl, mix together all the butter, the granola and sugar.  Drop by spoonfuls into the peaches, and cover, leaving a slight gap to release moisture..  Bake for about 35+ minutes at the side of your fire, turning occasionally. Times may vary, depending on your fire, and the type of Dutch oven you have.  Remove cover about 5 minutes before you think the peaches will be done, releasing any pent up moisture. 
Posted in Desserts | Tagged , , , , , | 4 Comments

Half-Hour Marinated Pork Chops

I no longer have access to a grill, unfortunately.  I have missed it quite a lot.  I used it year-round.. nothing like chicken hot off the grill in mid-January.  The ease of a gas grill made using it year round so simple, and an extension of my kitchen.

But since I don’t have any way to actually have a grill any longer, I’ve been using my oven broiler.  It’s taken a bit to get used to, because there are things you just, simply put, cannot do.  Nothing has that – just-off-the-grill flavor that I miss.  You do not get that smokey flavor of wood, and tbh, who wants a broiled hamburger, anyway>?

One thing I always loved to grill was pork chops.  Pork chops, for those not from the US, are basically, a center cut or rib cut loin chop.  They are great for hot and dry cooking and just made for the grill.  Or broiler, as it turns out. 

I never really had success using a gas oven broiler – the moisture that it held just never gave food that taste I was looking for.  Moving into this apartment in May, I’ve had to give up having a gas stove and oven and have been using an electric.  It’s taken a while to adjust to — the stove never gets as hot, and you cannot control an electric as you do gas.  Let’s just say it’s been an adventure .. and I’ve needed elbow grease on more than one occasion to clean a pan. 

But I have found that the oven part of this contraption works splendidly for baking, and for broiling.   The dry heat of an electric oven seems to produce food that is crisper, more evenly cooked, and it never has that.. underdone taste to it.

I’ve adapted a favorite pork chop recipe that I always used on a gas grill to oven broiler use.  I don’t know what your oven is like, and you’ll have to adjust the times, but generally speaking, this is a quick cook.

Half-Hour Marinated Pork Chops

1/4 cup lemon juice, fresh if possible
3 tablespoons soy sauce
1 tablespoon olive oil, or vegetable, but not corn (as it is sticky)
3/4 tablespoon brown sugar
1/4 teaspoon fresh rosemary, chopped
1/2 teaspoon salt (kosher)
1/4 teaspoon black pepper
4-6 Pork chops *see note below

Mix together all the ingredients, except the pork chops.

In a plastic bag, such as a ziplock,  put in the pork chops and cover with the marinade.  Try to get as much air out of it as possible, and then smush it around, turning it a few times to get all the pork covered and the marinade distributed as evenly as possible.  Stick it in the refrigerator for about 30 or so minutes, but no more than 4 hours.  Don’t do this over night or the pork will be inedible.

About 40 minutes before you are ready to cook the chops, take out of the refrigerator and bring up to room temp. 

image If using a broiler, turn it to highest setting.  Put the oven rack at the second place down (not the top place just under the broiler), about 6-8 inches below the heating element.  I use either the broiler pan that usually comes with the oven, or a grill pan (as shown). 

Heat the pan for about 2 minutes, and then place the pork chops in the pan.  Turn the broiler heat to low-medium and cook for about 6-7 minutes, and then turn.  Cook for about 4 more minutes, or until the pork chops are no longer pink inside, yet still juicy.  This will depend a lot on the thickness of your chop, if bone is left in, the age of the chop, and your oven. 

If using a gas grill, cook over direct high heat for about 5 minutes or so.  Turn once, at the 3 minute mark, then move the pork chops to indirect heat and cook about 7-9 more minutes.

Notes:

Pork chops come in all sorts of cuts these days:

  • Bone in, thick cuts from 1 1/2 inches and up
  • Bone in, thinner cut – 3/4 inch
  • No bone, but still thick (1-1/2 inches and upwards)
  • No bone, but 3/4 inch thick
  • Thin sliced, 1/2 inch thick
  • Ultra thin sliced, at about 1/3 inch

I don’t suggest using anything but bone in, and no less than 3/4 inch thick, no more than 1 inch thick.  If you go any thicker, the chops will dry out.  If you go too thin, the chops again have a tendency to become dry, though it can be done if you are careful and time it well.  I usually just go for bone in, 3/4 inch thick.  There are other ways to use the thicker chops, but this particular application, either under a broiler, or on a grill just is not it.

Tagged , , , , , , , | 10 Comments