Spring has sprung – Brussels Sprouts, with Apple Cider Vinegar

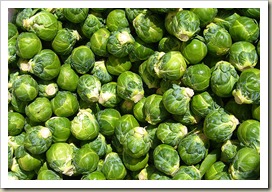
I really do love Brussels Sprouts.  A member of the cabbage family, these have been cultivated over the years to be dense, leafy “miniature green cabbages”.  They have a sweet, but earthy taste that is not easily describable. 

I will admit, though, that as a child, I hated these green balls of nastiness.  As an adult, I learned to cook them properly (my mother over-boiled them to mush – NOT the right way!!), and have come to really look forward to them in spring.

My usual way of cooking these is just to steam them until they are soft, but still have a but of crunch left in them.  I really dislike these when they are over-cooked bits of mush. 

The recipe here was shared with me by a co-worker.  She had brought these in as leftovers from the night before, and everyone tasted them..and we all wanted more.

Brussels_sprout_closeup

Brussels Sprouts, with Apple Cider Vinegar

1 pound fresh brussels sprouts, cleaned and trimmed.  Cut each in half
2 tablespoons olive oil
3/4 cup of vegetable stock (or water)
2 tablespoons sugar
2 tablespoons apple cider vinegar
Salt and pepper, to taste

Heat the oil in a sauté’ pan over medium heat.  When hot, add the brussels sprouts and salt.  Sauté, stirring occasionally, until the sprouts become golden – 5 to 10 minutes, depending on the size.

Add in 1/2 cup of the stock and bring to a boil.  Lower the heat, cover and simmer with the lid slightly ajar, until the sprouts are almost tender, and most of the stock/water has simmered away.

Remove the lid, and add in the last of the stock, the sugar, and the apple cider vinegar.  Cook over medium-high heat, stirring occasionally, until the liquid is reduced.  About 5 minutes.  Season with salt & pepper. 

These can be served either hot or cold.

Tagged | 1 Comment

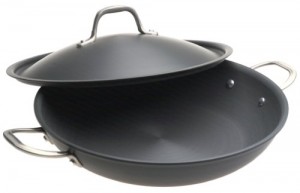
Kitchen Tools: Calphalon Everyday Pan

I am one of those people who don’t believe in buying a “set” of pots and pans, unless it is a really good set, with the essentials. I don’t really think you need a 1 cup pot, or a 20 piece cookware set.  What you really need are a few good essential pots and pans – and they usually don’t come in the sets.

Not all of the pots and pans I have are the same make — I bought the best I could find, the best pan for the job, as I found them on sale.  For example, the list price on the Calphalon Everyday Pan is $169.00.  !!!!  No way is that even near something I can afford.  However, Amazon (link) sells this regularly on sale for somewhere between $29 and $40.  Much more in line with my budget.

I recommend getting every pot and pan with a lid.  You won’t always want it, but when you do, it’ll be there.

  • 1 8 Quart Pot, with steamer
  • 1 Saucier, with lid
  • 1 12 inch Everyday Pan, with lid
  • 1 3 or 4 Quart sauce pan, with lid
  • 1 10 or 12 inch Non-stick fying pan, with lid

By far, the pan I use most is the Calphalon Everyday Pan.  I can saute, fry, braise, broil, bake, roast just about anything in it.  It most litterally is used every time I cook.

The Everyday pan is made of heavy-guage hard anodized aluminum, heat safe up to 450F; it’s not officially non-stick, but “less” stick. Included with the pan is a dome shaped lit, also made of anodized aluminum. As with all of Calfalon’s products, it has a lifetime warranty.

About the only thing that I dislike is that, with a lot of use, it discolors.  Other than that one complaint, I would make this my first purchase when buying.

The pluses to this pan are numerous — Use it to make risotto, fried chicken, delicately cooked cream sauces, pancakes, omelette’s, stir fry, or roast a chicken in the oven.  Just anything.

Tagged | 3 Comments

Traditional Egg Bread (Challah)

I use this for Runza as well as the traditional Challah bread.  This recipe is directly from a New York Times recipe publication quite a few years ago.

Traditional Egg Bread (Challah)

1 teaspoon sugar
1/2 cup warm water
3 teaspoons yeast
4 cups flour
4 tablespoons sugar
1 teaspoon salt
1/3 cup oil
2 eggs
1/4 cup warm water
1 egg yolk, beaten with
1 teaspoon water
Preheat oven to 400°F
Dissolve 1 teaspoon sugar in 1/2 cup water in bowl of mixer. Sprinkle yeast over water and mix, let stand 10 minutes until foamy.
Add the next 6 ingredients to mixing bowl. Mix with dough hook for 6 minutes, or by hand. Dough should be a little sticky. Place in oiled bowl, cover and let rise in warm place until double in bulk. Punch down dough. Let rise again until double in bulk. Punch down again. Divide dough into 3 equal parts. Roll dough into three long strands. Braid the strands, tucking ends under. Cover with towel and let double in bulk. Brush with beaten egg yolk. Sprinkle with seeds. Bake at 400 F for approximately 30 minutes, until golden brown. The challah is done when it sounds hollow when thumped on the bottom.

NOTE:

If you are using this for Runza, after the first rise, roll the dough, follow the Runza directions – rolling the dough, fill, and seal.  Allow these to sit for about 20 minutes for the second rise.  Bake per the Runza directions.

Tagged , , , | 8 Comments

White & Milk Chocolate Peppermint Bark Candy

One of my favorite things at the holiday is the taste peppermint.  And nothing is better than peppermint and chocolate,  and a cup of hot cocoa.   However, the place we usually get peppermint bark is at Williams-Sonoma and is out of price range for me.  I’ve tried other types, bit it never quite matches up.  So.. I searched high and low (okay, one Google search), and found what I wanted.  The original post is here.
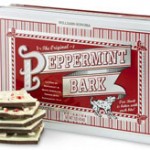
This recipe is really similar to Williams-Sonoma.  I didn’t use dark or semi sweet chocolate, though, as I had milk-chocolate chips in the house already.  I also could not find “Peppermint” extract in any of my local markets, so I ended up using a genera “Mint” extract.

The original recipe has you melting the chocolate over a double boiler.  I find that to be a bit fussy, and so stick to the microwave method.  The trick to melting chocolate in the microwave is to stir it every 30 seconds, or it can burn or separate.

I made this for New Years Eve and everyone loved it.  Yummmy goodness!

Peppermint Bark

12 ounce bag chocolate chips, any – dark, semi or milk
16 ounce bag white chocolate chips
1/2 teaspoon peppermint extract
1/2 cup peppermint candy, crushed

Preheat the oven to 250F (121C).

Crush the peppermint candy.  I used about 10 candy canes when I did this.  I tried crushing these with a wooden mallet, and then ended  up putting the candy into a ziplock, and getting out the hammer!!  Do what works for you.

Line a 9×13 pan (cake pan) with foil.  Let the foil hang over the edges and wrap it around.  Spray the foil with non-stick spray, or, using vegetable oil, spread the oil lightly over the bottom of the pan, as well as the sides.

Pour in the chocolate chips and spread them out evenly.  Try to put them in as evenly as possible the first time, so you don’t get oil on the top of the chocolate.  Place the pan in the oven for 5 minutes.  Remove from the oven.  The chips will look glossy, but will be melted.  Spread the chocolate out evenly.  Place in the refrigerator until firm – 20-30 minutes.  Remove from the refrigerator and allow to sit for 10 minutes.  Remove any condensation that may occur with a paper towel.

Once the chocolate has been out for the 10 minutes, place the white chocolate chips in a microwave safe bowl.  Place in the microwave for 30 seconds.  Remove.  Stir.  Replace and set for another 30 seconds.  Do that until the chocolate has melted.  Add in the peppermint extract and stir well.

Once the white chocolate has melted, pour it over the chocolate in the pan, and spread evenly.  Sprinkle with the crushed peppermint.   Refrigerate about 1 hour.  Lift the foil out of the pan and remove the excess peppermint and the foil.  Break or cut this into pieces.  For a more “formal” look, cut it into 2 inch wide strips.   You can store this in a cool, dry place for a couple of weeks or longer in the refrigerator.  Place the pieces in a container, layer with parchment paper and store tightly sealed.  This makes about 2 pounds.

Variations:

Replace the peppermint extract and peppermint candies, using a variation below:

Almond Bark – Use 1/2 teaspoon almond flavoring, and 1/2 cup of blanched, chopped (or sliced) almonds.

Cherry Almond – use 1/2 teaspoon almond flavoring, 1/3 cup dried cherries, minced, and 1/2 cup blanched, chopped (or sliced) almonds

Maple Walnut Bark – Use 1/2 teaspoon maple flavoring, and 1/2 cup of chopped walnuts

Cranberry & Pistachios – 1/3 cup of dried cranberries, minced, and 1/2 cup of pistachios

Toasted Coconut and Almonds – 1/2 cup blanched, chopped (or sliced) almonds, and 1/3 cup of shredded coconut

Other variations:

Peanut Butter–  Replace the white chocolate, mint and peppermint candies with  16 ounces Peanut butter chips and  1/2 cup salted peanuts

Butterscotch – Replace the white chocolate with peanut butter chips, the chocolate with butterscotch chips, don’t use the peppermint extract, and replace the candy with peanuts and broken pretzels

Posted in Christmas, Desserts, holiday | Tagged , , , , , , , , , , | Leave a comment

Chocolate Covered Peppermint Patties

I love these things.. I love all mint-chocolate recipes, and especially this one, as it is really just yum.  It is, as most of my recipes are, simple and easy to do.  It does take some time, and is a bit messy, but is really worth it.   At Christmas, I usually have cut these into star shapes, or tree shapes, and have, on occasion, colored the peppermint dough a bright green, for fun.

Enjoy!

chocolate-chips

Chocolate Covered Peppermint Patties

1 egg white
4 cups powdered sugar (10x)
1/3 cup light corn syrup
3/4 teaspoon peppermint extract
cornstarch
12 ounce bag of chocolate chips (either semi-sweet, or milk)

Beat the egg white until frothy, but don’t let it get stiff.

Begin adding the powdered sugar, blending with a mixer, if you have one. A fast whisk if you don’t.

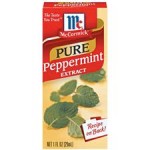
pure peppermint extractAdd in the corn syrup and the peppermint extract. You will need to knead this with your hands — add in more powdered sugar if you need to, until the mix isn’t sticky.

Cover a surface with cornstarch, and roll our the dough until it is about 1/4 inch thick. Using a cookie cutter (think fun shapes for holidays), cut out the dough. If you use a 2 inch cutter, you should be able to get about 20. Set the cut out pieces on a parchment lined baking sheet, and refrigerate for at least 2 hours. If refrigerating overnight, cover with plastic wrap.

Meanwhile, melt the chocolate. Use a microwave, and do short 30 second burts, stirring in-between, so the chocolate melts slowly, and isn’t broken.

Remove the peppermints from the refrigerator. Grab a second baking sheet, and line it with more parchment paper. Dip each piece into the melted chocolate (use a couple of forks, drop the piece in, lift out with the forks, and remove the excess chocolate by tapping the bowl. Place the peppermints on the parchment to cool. If this goes slowly for you, reheat the chocolate, again using the 30 second method, until the chocolate is melted again. Continue to dip the peppermints until you are finished. Don’t forget to lick the forks when you are done ;)

Refrigerate the peppermints for 30 or so minutes, or until the chocolate has hardened up. Wrap in candy wraps, and store in a cool dry area for up to 2 weeks.

Posted in Christmas, Desserts, holiday | Tagged , , , , , | 2 Comments

Good Eats Roast Turkey Recipe

This is Alton Brown’s Good Eats Recipe for Turkey.

alton-brown_l

Good Eats Roast Turkey Recipe

Recipe courtesy Alton Brown

1 (14-16 pound) frozen young turkey

For the brine:

1 cup kosher salt
1/2 cup light brown sugar
1 gallon vegetable stock
1 tablespoon black peppercorns
1/2 tablespoon allspice berries
1/2 tablespoon candied ginger
1 gallon iced water

For the aromatics:

1 red apple, sliced
1/2 onion, sliced
1 cinnamon stick
1 cup water
4 sprigs rosemary
6 leaves of sage
Canola oil

Combine all brine ingredients, except ice water, in a stock pot and bring to a boil. Stir to dissolve solids, then remove from heat, cool to room temperature refrigerate until thoroughly chilled. Early on the day of cooking, (or late the night before) combine the brine and ice water in a clean 5 gallon bucket. Place thawed turkey breast side down in brine, cover, and refrigerate or set in cool area (like a basement) for 6 hours. Turn turkey over once, half way through brining.

A few minutes before roasting, heat oven to 500°F. Combine the apple, onion, cinnamon stick and cup of water in a microwave safe dish and microwave on high for 5 minutes.

Remove bird from brine and rinse inside and out with cold water. Discard brine. Place bird on roasting rack inside wide, low pan and pat dry with paper towels. Add steeped aromatics to cavity along with rosemary and sage. Tuck back wings and coat whole bird liberally with canola (or other neutral) oil. Roast on lowest level of the oven at 500°F for 30 minutes. Remove from oven and cover breast with double layer of aluminum foil, insert probe thermometer into thickest part of the breast and return to oven, reducing temperature to 350°F. Set thermometer alarm (if available) to 161°F. A 14 to 16 pound bird should require a total of 2 to 2 1/2 hours of roasting. Let turkey rest, loosely covered for 15 minutes before carving.

Yield: 10 to 12 servings

Posted in Christmas, Thanksgiving | Tagged , , , , , | 1 Comment